A Sapphire Form can include an Image control that displays one or more images attached to the current record![]() The record currently displayed in Details View or highlighted in List View (there is a faint dotted line around it). It is only possible to have one current record at a time.. The Image control may also allow you to manipulate an image (freehand draw / annotate), remove it from the current record, and upload one or more images to attach to the current record.
The record currently displayed in Details View or highlighted in List View (there is a faint dotted line around it). It is only possible to have one current record at a time.. The Image control may also allow you to manipulate an image (freehand draw / annotate), remove it from the current record, and upload one or more images to attach to the current record.
Tip: Some Forms will allow you to upload any type of multimedia, not just images.
If you add an image to the current record by uploading a new image, several things will happen when the Form is saved:
- A new record for the image will be created in the Multimedia module.
- The new Multimedia record will be attached to the current record.
It is important to keep in mind that a Form is usually designed to edit records or create new records in modules such as the Catalogue or Parties: the purpose of an Image control is to allow you to view, add or remove images attached to the current record (a record in the Catalogue module for instance). While you create Multimedia records when you upload a new image, when you use the Remove image  button you are removing an attachment to the Multimedia record, not deleting a record from the Multimedia module.
When more than one image is added to an Image control, the Image control functions as a (static) carousel that enables you to cycle through the images (details below):

| # |
Icon |
Label |
Description |
|---|---|---|---|
|
1 |
|
Select Image (and other ways to add an image to a Form) |
Locate and add one or more multimedia files to the Image control. Sapphire Forms can:
Tip: Some Forms will allow you to upload any type of multimedia, not just images. There are several ways to upload a file and save it to a new Multimedia record:
-OR- For example, to add a new image:
-OR- -OR- When the Form is saved:
If the Form already contains an image, adding another image transforms the Image control to a (static) carousel, with a thumbnail of each image displayed below the current image; several methods are available for moving through the images (details below). Note: If an upload times-out, it is likely that the file size of the upload is too large. It will be necessary to reduce the number of files being uploaded or, if possible, compress the multimedia file(s). |
|
2 |
|
Zoom in / out |
Click to zoom in / out an image. Alternatively, use your mouse scroll wheel to zoom in and out. Tip: Click anywhere on an image, hold the mouse button and drag the cursor to move the image. |
|
3 |
|
Remove image / annotation |
Used to remove an annotation from an image; or to remove an image from the Image control. To remove an annotation, click the annotation to select it and then click If the Form displays an image attached to the current record Note: This action removes the attachment between the current record (a record in the Catalogue module for instance) and the record for the image in the Multimedia module. It does not delete the Multimedia record, and the image could be reattached to the record or attached to another record. |
|
4 5 |
|
Select Tip: Annotations can be placed on the image and (in Sapphire version 10 onwards) outside of its borders. In order that each option selected from the Annotate drop list has a different colour by default, it is necessary that the following is set in
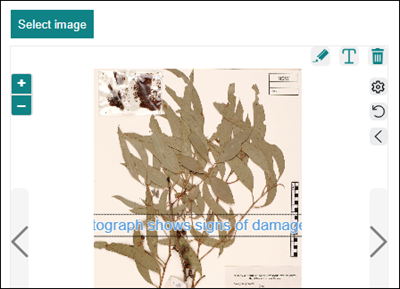
The Annotate tool is used to add text to an image:
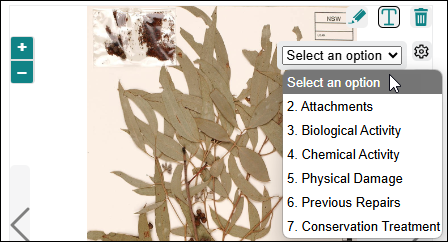
From Sapphire version 10 onwards the Annotate tool can be used with a drop list of reasons for an annotation:
Reasons for annotating images can be defined in an EMu Lookup List and associated with the Annotate tool (details here): a drop list is added to the Image control holding the annotation reasons. It is possible to configure Sapphire so that each option in the drop list has a specific colour and size, differentiating it from annotations for every other drop list option. In this example, annotations added when 5. Physical Damage is selected will have a different colour and size to annotations added when 6. Previous Repairs is selected. Tip: A default text colour and size are assigned to each entry in the drop list, both of which can be changed with the Settings When the Annotate tool is not associated with a Lookup List, selecting
When the Annotate tool is associated with a Lookup List:
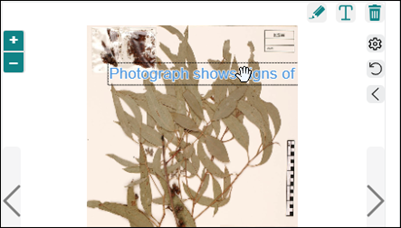
Click the text handle to select it and:
Note: Be sure to save any changes you make to the image! Select
Click the image, hold down the mouse button and move the cursor to draw a freehand line on the image. Two additional icons display when the Annotate or Draw tool is selected:
The size and colour of annotation text and a line drawn with the Draw tool can be customized with the Settings For every image that is modified with the Sapphire Annotate or Draw tool, you will find two Multimedia records:
The Annotations tab in the record with the original image includes read-only details about all annotations and lines added to the image. This information is used to reload annotations / drawings when the image is viewed in Sapphire. An annotation has a Type of text; a line drawn with the Draw tool has a Type of draw:
Details about an annotation include the text; coordinates of an annotation ( For a line drawn with the Draw tool, the Coordinates list is a group of points defining the line:
Again, |
|
|
6 |
|
Used to configure the width of the line drawn with the Draw tool, and the size of text written with the Annotate tool; and to change the colour of both:
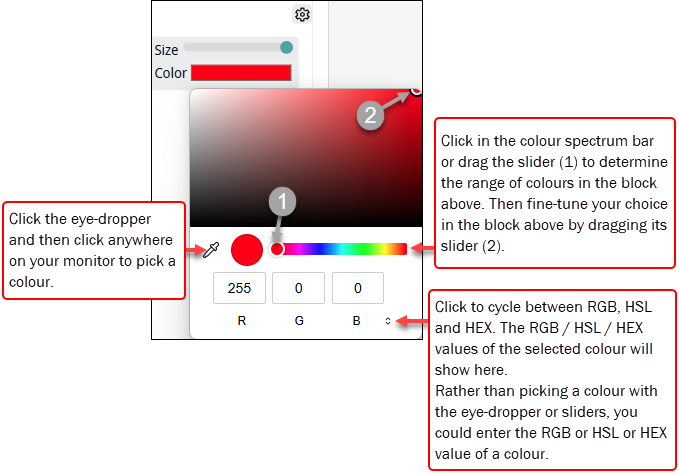
Click in the Size line or drag the dot to change the width of the line drawn with the Drawing tool / the font size of text written with the Annotate tool. Click the Colour bar to display a colour chart popup:
There are several ways to set the colour of the line:
|
|
|
7 |
|
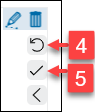
Undo |
Select |
|
8 |
|
and Image carousel |
When more than one image is added to an Image control, the Image control functions as a (static) carousel that enables you to cycle through the images. Several methods are available for viewing the images loaded in a Form. The Image control can display one or more images already loaded into your system and attached to the current record; it could also be designed to allow you to upload images and attach them to the current record. A record, in the Catalogue module for example, can be attached to one record for an image in the Multimedia module:
or to multiple records:
The Image control in a Sapphire Form can display the attached images. In this example, the Form pulls details from the Catalogue record with two Multimedia records attached:
When more than one image displays in an Image control, the Image control functions as a (static) carousel, making it possible to cycle through the images: The current image occupies most of the carousel area. Below that is a row holding a thumbnail of all loaded images, with the thumbnail of the current image highlighted by a grey border. Several methods are available for moving through the images:
This default behaviour can be disabled by suitably authorized users by setting |
 icon (as above), you can search for a record and display attached images. Details


 option.


 ).
).


Save and Reset
- To save any changes back to a record in EMu, select
 at the bottom of the Form.
 - To reset the Form to its state when the image was loaded, select
 at the bottom of the Form. Any changes you have made (annotations, removing an attachment, etc.) will be undone.
Tip: These buttons are not enabled until changes are made to an image displaying in the Image control.